1.Log in to your dashboard--> layout- -> Edit HTML
2.Don't click on "Expand Widget Templates"
3.Scroll down to where you see like this code:
margin: 5px; border: 1px solid $bordercolor; text-align: center; color:$pagetitlecolor; } |
4.Now replace above code with below code :
float:left; width:30%; height:200px; margin: 0px; border: 0px solid $bordercolor; text-align: center; color:$pagetitlecolor; } #header2{float:left; width:30%; height:200px} #header3{float:left; width:39%; height:200px} |
Look at the picture below.
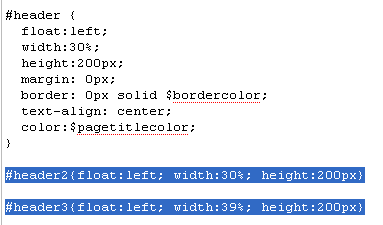
Note : If you like you can change width,height,... as your choice.
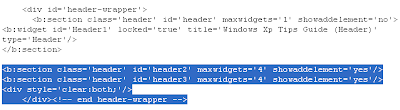
5.Now again scroll down to where you see like this code:
<b:section class='header' id='header' maxwidgets='1' showaddelement='no'> <b:widget id='Header1' locked='true' title='YOUR-BLOG-TITLE (Header)' type='Header'/> </b:section> </div> |
Remember that YOUR-BLOG-TITLE is your real blog title.Look at the example below.

6.Now replace this code with below code :
<b:section class='header' id='header' maxwidgets='1' showaddelement='no'> <b:widget id='Header1' locked='true' title='YOUR-BLOG-TITLE (Header)' type='Header'/> </b:section> <b:section class='header' id='header2' maxwidgets='4' showaddelement='yes'/> |
Look at the example below.
7.Now save your template and your done.It will look like this.

File Under : change template, html
Why your blog not showing well in mozilla firefox?
Do you know this my friend?
Anyway...Great tutorial for beginners...keep doing it..
Your best friend ramesh
again, another great source of info here. i love this stuff...
dave lee.
thanks for the tips & made it : ) however how to add another additional header above on it? thanks
To Mohammad Faizal,
To Add nother Additional Section above you blogger header,
1.Log in to your dashboard--> layout- -> Edit HTML
2.Don't click on "Expand Widget Templates"
3.Scroll down to where you see like this code:
<div id='header-wrapper'>
<b:section class='header' id='header' maxwidgets='1' showaddelement='no'>
<b:widget id='Header1' locked='true' title='YOUR_BLOG_TITLE' type='Header'/>
</b:section>
</div>
4.Now copy below code and paste it just before above code.
<div id='crosscol-wrapper' style='text-align:center'>
<b:section class='crosscol' id='crosscol2' showaddelement='yes'>
<b:widget id='HTML184' locked='false' title='' type='HTML'/>
</b:section>
</div>
Now save your template and you are done.
Very good tip, thank you very much!
I have some questions for you...
1) Your tip works well but I have a problem: I want to have 3 differents images at the top of my blog (as ads images with a different link for each image so) but the first one is shifted upside (actually it's the two others wich are shifted downside I think) and I would like to have them perfectly lined up, how could I do that please?
I am under the "new version" of blogger, my main template is the "original" one and there is my html code (I put "_" at the beginning to make it more readable and "diiv" instead of "div" because your robot doesn't allow me to post this):
---------------------------------------------------------------------
.header {
__float: left;
__width: 33%
__margin: 0px;
}
.header2 {
__float: left;
__width: 33%
}
.header3 {
__float: left;
__width :33%;
}
--------------------------------------------------------------------
__
__
______
______
______
__
__
__
---------------------------------------------------------------------
I tried some stuffs like changing the value of "clear" but the three elements go on each other in a mess, I also tried to add some "top-padding" to the first header but it moves the 3 images and top-padding the other ones don't do anything...
2) I would like these 3 images to be in a "top bar" wich would be as wide as possible (adjusting the screen width and not just shrink in the main page), is it possible?
Of course if somebody has a better idea to solve my both problems in one time it will be perfect (like just putting an html widget but I don't know how to put 3 images with different links in there).
My aim is quite simple: to have a full width top bar on my blog where I can easily put 3 different advertisement pictures...
Thanks again for your terrific website and for your time.
As I can see now the html code didn't work so I put it again without the "<...>":
__header
__div class='header-wrapper
____b:section class='header' id='header' maxwidget='1' showaddelement='yes'
b:widget id='Image3' locked='false' title='' type='Image'/
/b:section
____b:section class='header' id='header2' maxwidgets='1' showaddelement='yes'
b:widget id='Image1' locked='false' titles='' type='Image'/
/b:section
____b:section class='header' id='header3' mawidgets='1' showaddelement='yes'
b:widget id='Image2' locked='false' title='' type='Image'/
/b:section
__div style='clear:both;'/
__/div
__/header
thanks nice topic
Thanks a Lot. It helped me immensely
nice and usefull article..
i'll apply it in my blog soon.
thx.
thnx Works Great on my site..
http://fullgames2all.blogspot.com
this is working great on my blog!!!! thanks a lot, i have been looking for this code for a very long time now.
Sir These Codes Are Not In my site