This tutorial explains how to add tooltips to the links of your website or blog using "Easy Tooltip" jQuery plugin. A Tooltip is a hint that appears when an user hovers the pointer over an item that contains a brief text message identifying the object. Follow the steps given below to add Easy Tooltip to your website.
1.If you are using Blogger, go to "Edit HTML" of your blog.
2.Add this code just before </head> tag:
<!-- jQuery : remove these 2 lines if jQuery already included -->
<script src='https://ajax.googleapis.com/ajax/libs/jquery/1.12.4/jquery.min.js' type='text/javascript'></script>
<script src='https://cdnjs.cloudflare.com/ajax/libs/jquery-migrate/1.4.0/jquery-migrate.min.js' type='text/javascript'></script>

<script type='text/javascript'>
//<![CDATA[
(function($){$.fn.easyTooltip=function(options){var defaults={xOffset:20,yOffset:45,tooltipId:"easyTooltip",clickRemove:false,content:"",useElement:""};var options=$.extend(defaults,options);var content;this.each(function(){var title=$(this).attr("title");$(this).hover(function(e){content=(options.content!="")?options.content:title;content=(options.useElement!="")?$("#"+options.useElement).html():content;$(this).attr("title","");if(content!=""&&content!=undefined){$("body").append("<div id='"+options.tooltipId+"'>"+content+"</div>");$("#"+options.tooltipId).css("position","absolute").css("top",(e.pageY-options.yOffset)+"px").css("left",(e.pageX+options.xOffset)+"px").css("display","none").fadeIn("fast")}},function(){$("#"+options.tooltipId).remove();$(this).attr("title",title)});$(this).mousemove(function(e){$("#"+options.tooltipId).css("top",(e.pageY-options.yOffset)+"px").css("left",(e.pageX+options.xOffset)+"px")});if(options.clickRemove){$(this).mousedown(function(e){$("#"+options.tooltipId).remove();$(this).attr("title",title)})}})}})(jQuery);
//]]>
</script>
<!-- end tooltips -->

<script type='text/javascript'>
//<![CDATA[

jQuery(document).ready(function($) {
  $('a.easytooltip').easyTooltip();
});

//]]>
</script>

<style type='text/css'>
#easyTooltip{
padding:5px 10px;
border:1px solid #000;
background: #333;
color:#fff;
}
</style>
3.Save your template.
4.Now when you adding a HTML link, "easytooltip" CSS class and title attribute should add like this:
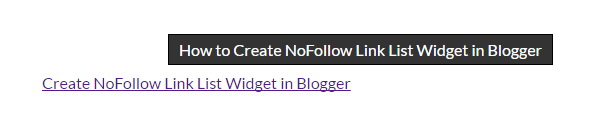
<a class='easytooltip' title='ENTER-LINK-TITLE-HERE' href='ENTER-LINK-URL-HERE'>ENTER-LINK-NAME-HERE</a>
Look at this example:
<a class='easytooltip' title='How to Create NoFollow Link List Widget in Blogger' href='https://www.bloggertipandtrick.net/nofollow-link-list-widget-blogger/'>Create NoFollow Link List Widget in Blogger</a>
Final result will look like this: